Appearance
How to Make a Genogram Online
You can make a genogram online by building the family structure directly in EasyGenogram, then adding relationship, health, and note details before exporting or sharing it. This is the fastest way to create a clean, editable genogram for classwork, telehealth, or ongoing family records. This guide walks through the full process step by step.
How to Make a Genogram Online: Step by Step
These are eight steps on how to make a genogram online.
Step 1: Open EasyGenogram
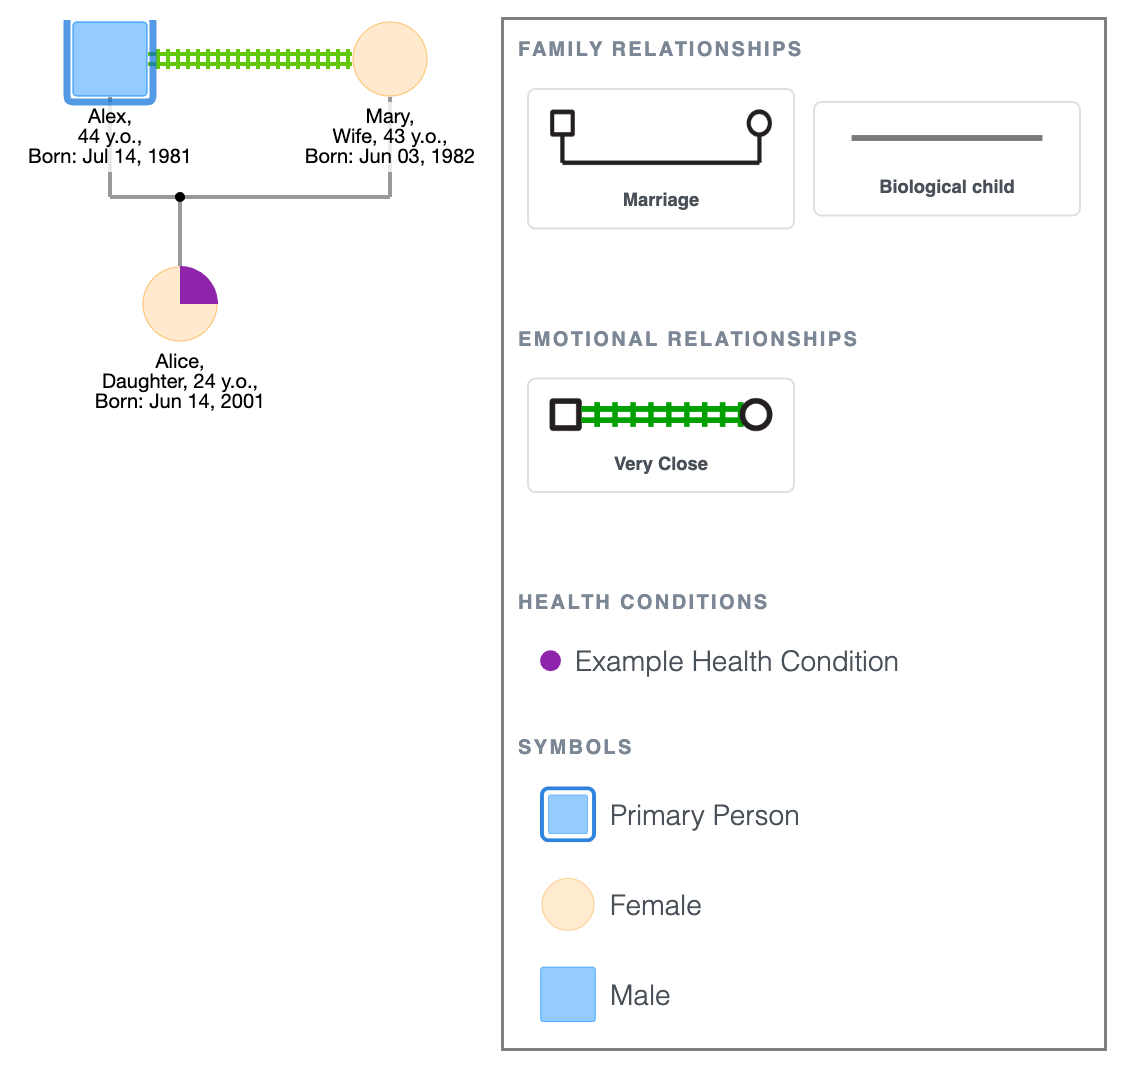
Go to EasyGenogram. The canvas already has a default family structure on it: a couple with one child, ready to customize. You won’t have to start from a blank page.

Tap any shape to open that person’s details panel on the right, where you can edit their name, gender, age, health conditions, and more.
The left panel also has two quick-start drag-and-drop templates.

"A couple + kids" lets you set the number of children and their genders before placing it.

"Multi generations" lets you set how many generations to include.

Drag your chosen template onto the canvas, then edit from there.
Family Genogram Example: Couple with a Child
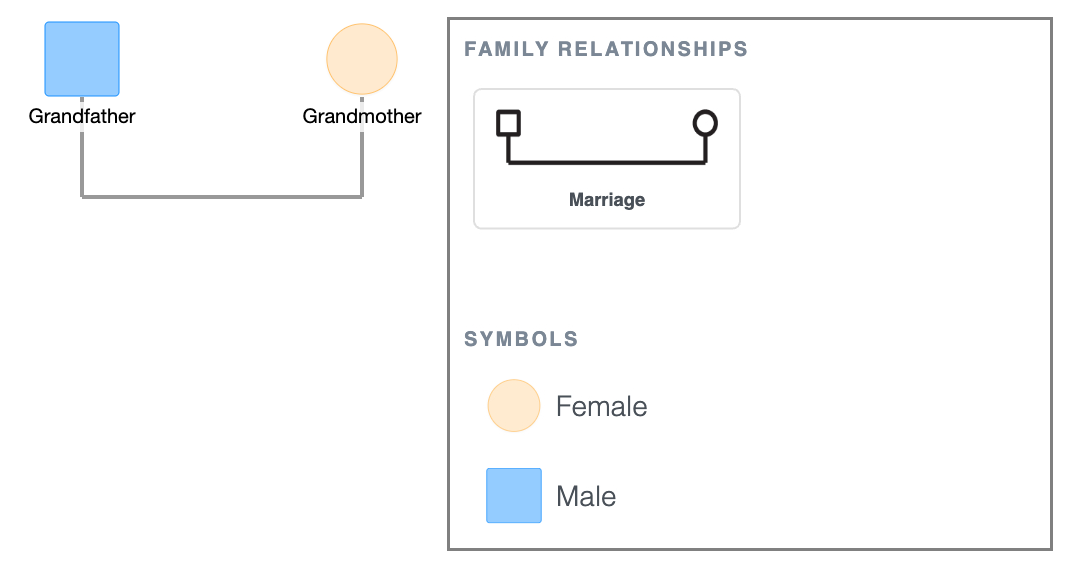
Step 2: Build the grandparent level
In this scenario, the default couple on the canvas becomes the grandparents.
Tap each shape to open the details panel and confirm or update the symbol type: Male for the Grandfather, Female for the Grandmother.
The marriage line between them is already in place.
1st Generation Genogram
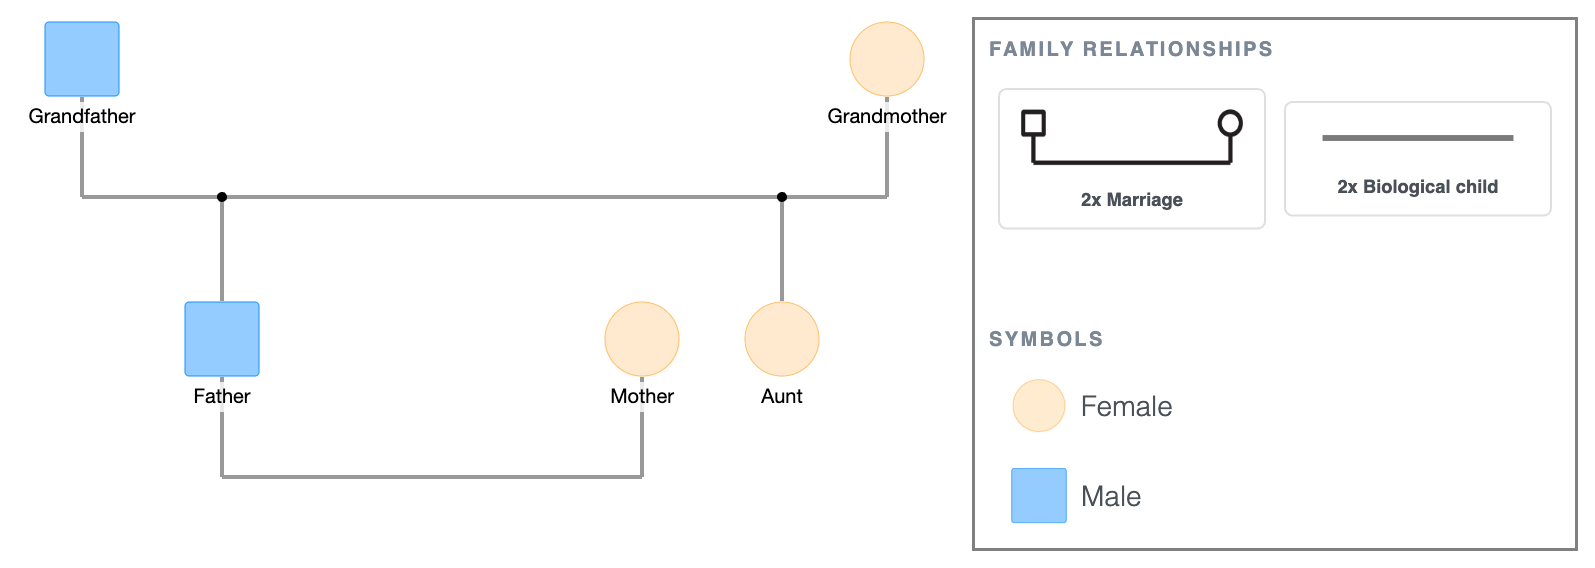
Step 3: Add the second generation
Click either the Grandfather's or Grandmother's shape; the quick-add buttons appear around it.

Click Add Children to add two children to the couple. Add 1 male and 1 female.

Since we clicked on the Grandfather’s shape, the partner is preset to “Grandmother.”

Notice how the children's shapes automatically connect vertically to the marriage line.
Add the names to the shapes as appropriate.

Now click Father's shape and select Add Partner to add Mother. EasyGenogram draws the marriage line automatically.

You can easily drag to reposition the shapes and lines. Spacing is important here, so that you can have a neat diagram.
2nd Generation Genogram
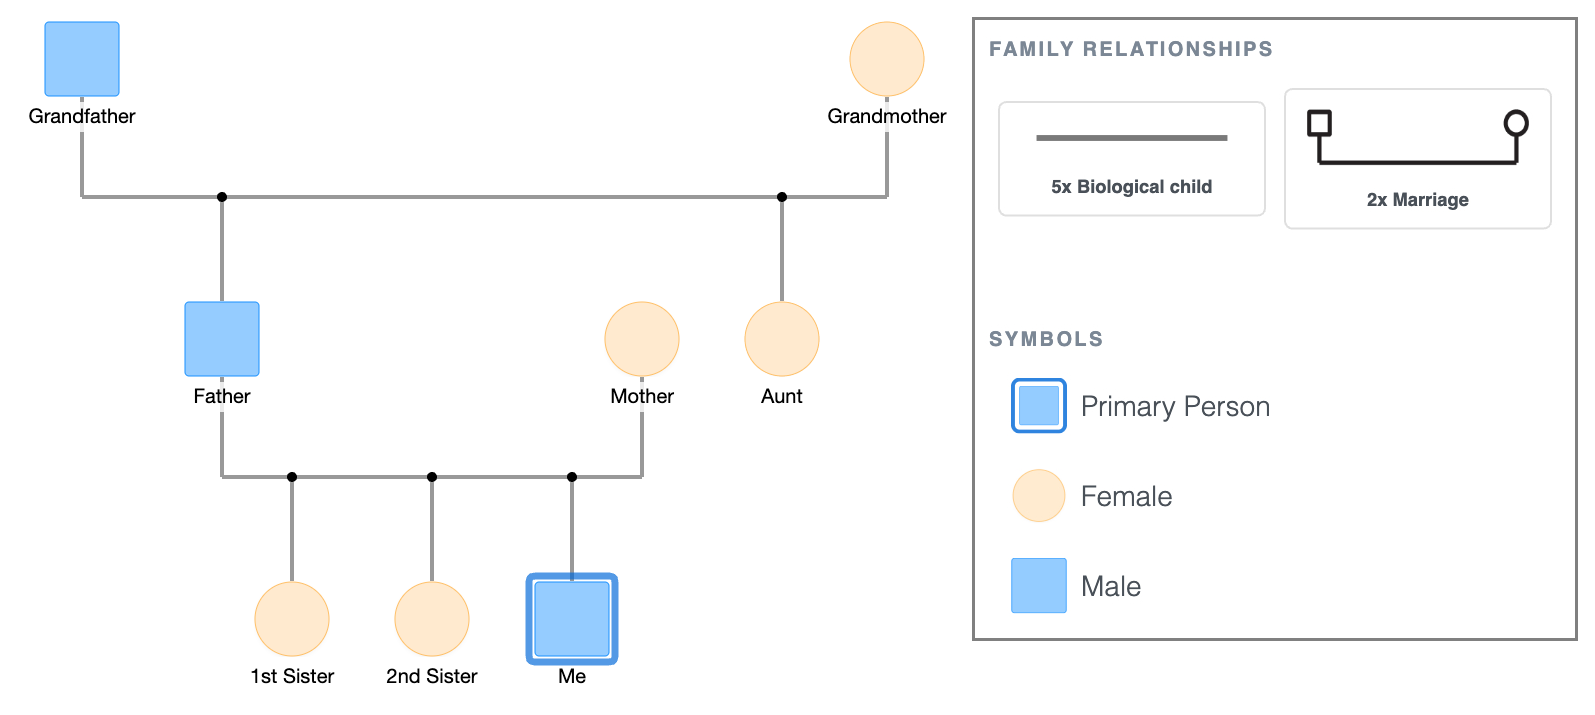
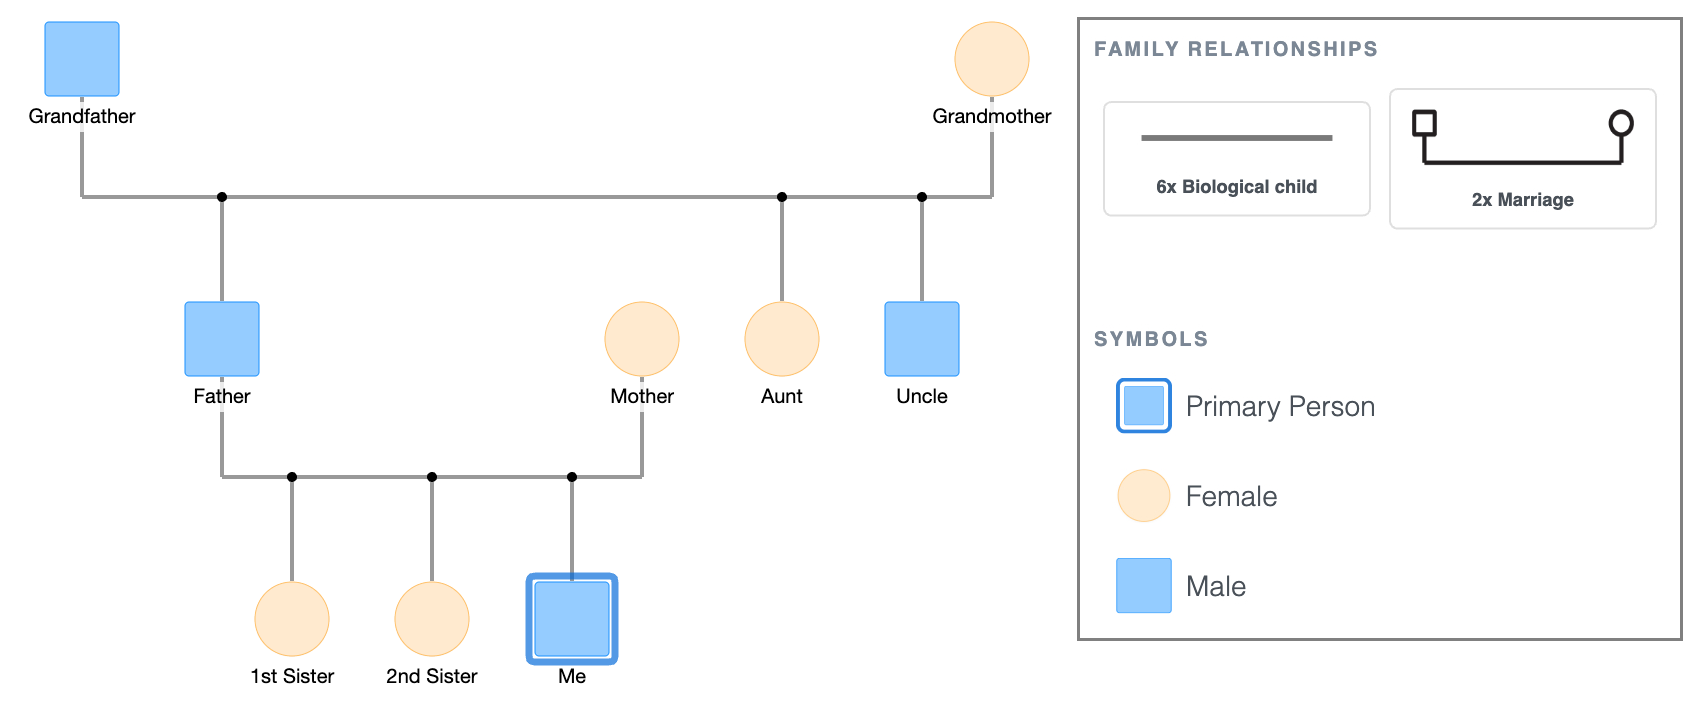
Step 4: Add the third generation
Click Father or Mother's shape; the quick-add buttons appear. Click Add Children to add their children.
We'll add three children: 2 females and 1 male.
Birth order runs left to right; oldest on the left, youngest on the right. Drag the shapes along the same horizontal level to rearrange them accordingly.

Drag the shapes along the same horizontal level to rearrange them accordingly.
Tap on “Me” and click the toggle to mark them as the primary person; the one around whom this genogram is built.

That's a complete basic three-generation genogram. It's ready to export as is.
3rd Generation Genogram
Families rarely look like the diagram above, however.
Step 5: Adding a third child to the grandparents
You can do this in two ways:
- Click either of the grandparents' shapes again and select Add Children to add a third child.
- Click either the Father or the Aunt shape and select Add Siblings.
The 3rd child then appears on the sibling bar alongside the Father and Aunt. Drag to reposition if the spacing needs adjusting.
3rd Generation Genogram + 3rd Child
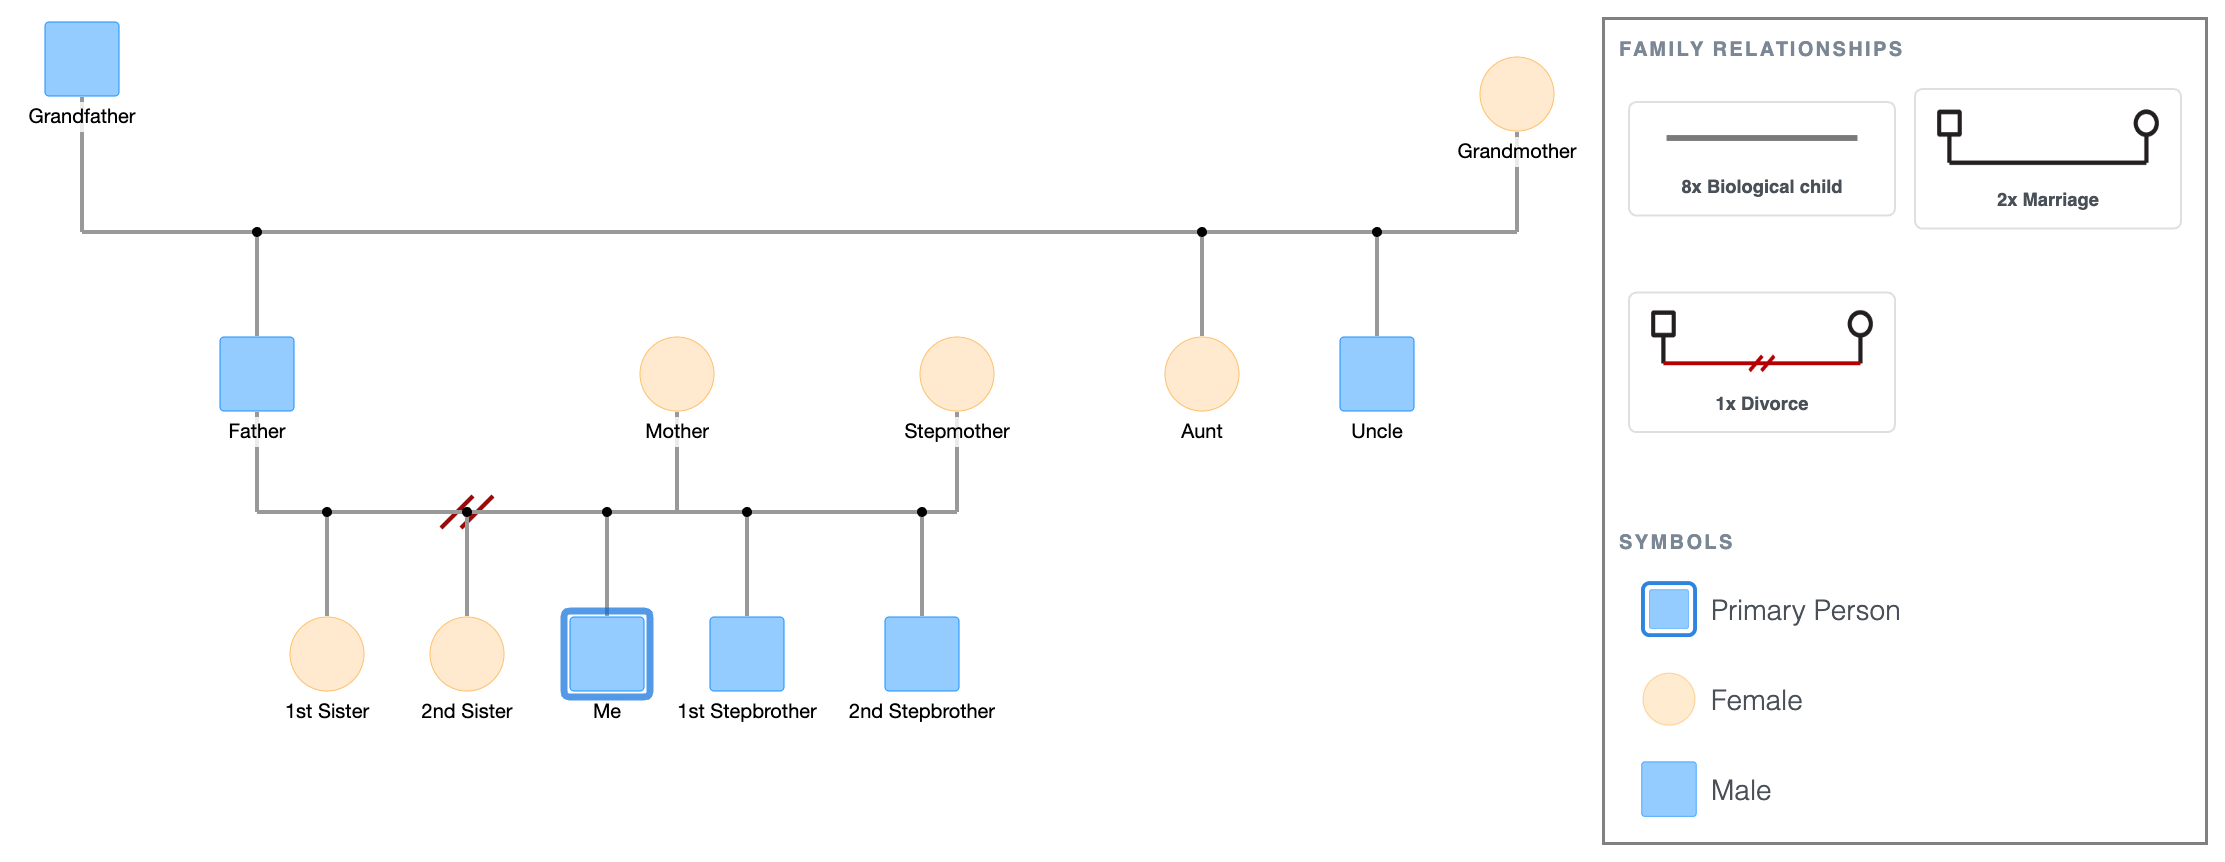
Step 6: Adding a divorce and remarriage
Tap Father and Mother’s marriage line and change the relationship type to Divorce.

Now click Father's shape and select Add Partner to add a second partner.
First partner (Mother) stays closest to Father, while the second partner (Stepmother) goes further out.

Adjust the shapes so the children from the first marriage stay connected below the first couple's line, and the children from the new marriage connect below the new couple’s line.
Adding a Divorce and Remarriage
Step 7: Adding emotional relationship lines
Click any person's shape; the quick-add buttons appear.
Click Connect, then click the shape of the person you want to draw the line to.
A relationship picker pops up to select the line type.
EasyGenogram has 30+ emotional relationship types organised into three tabs: Emotional Relationships, Family Relationships, and Children Connections. You select by name; no need to memorise what any line looks like.
The example below is a conflict line between Father and Mother after the divorce.
Adding Emotional Relationship Lines
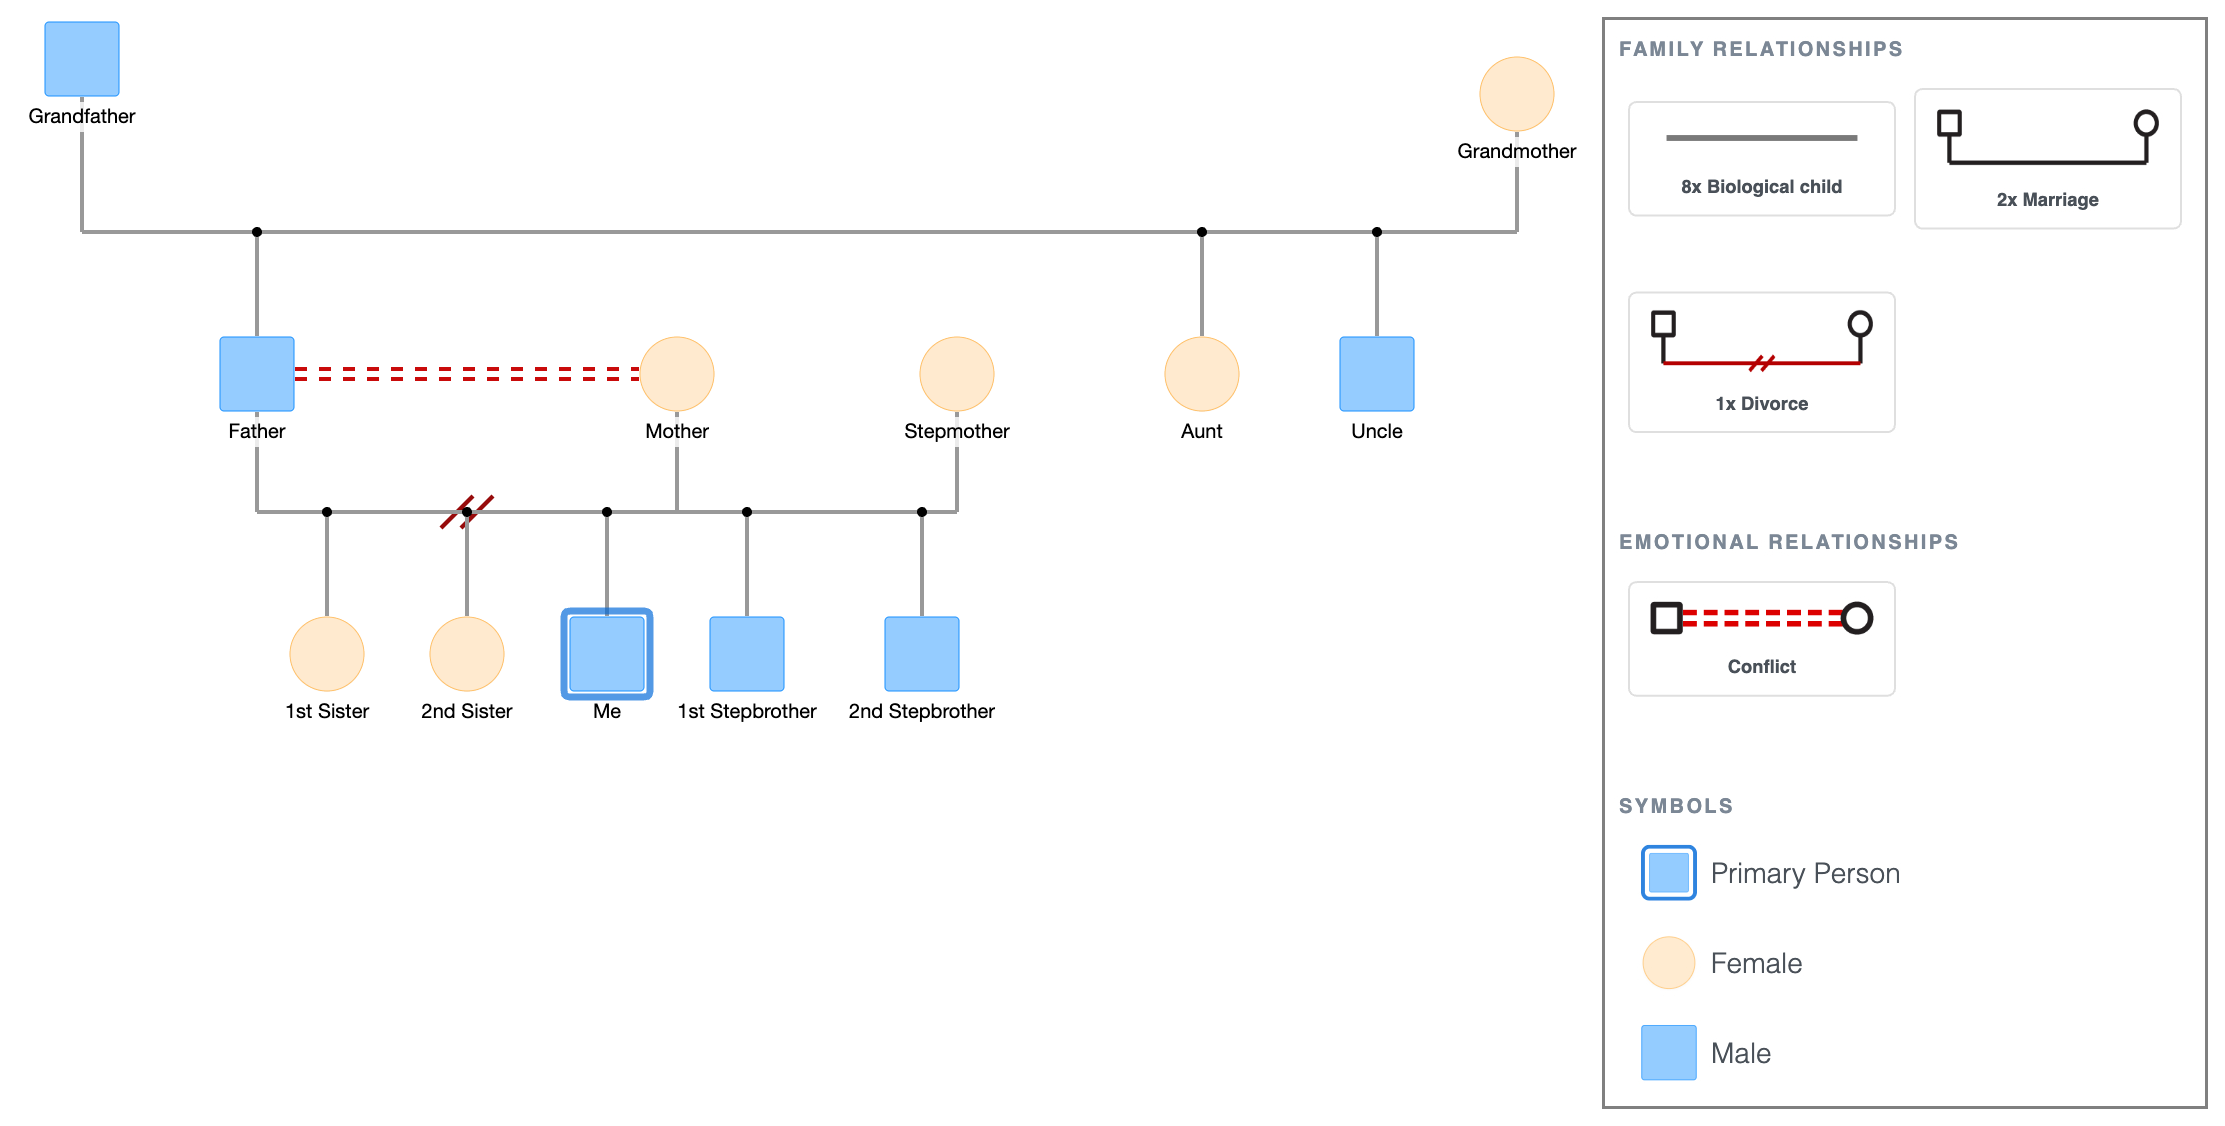
For relationship types not covered by the standard options (such as ambivalence, enmeshment, or any other thing) use the Custom Connections tab. Click Custom Connections, then Create Connection, and configure the line pattern, number of lines, and colour to match the notation you need.
Draw emotional lines only after the structure is complete, so they route cleanly around existing connections.
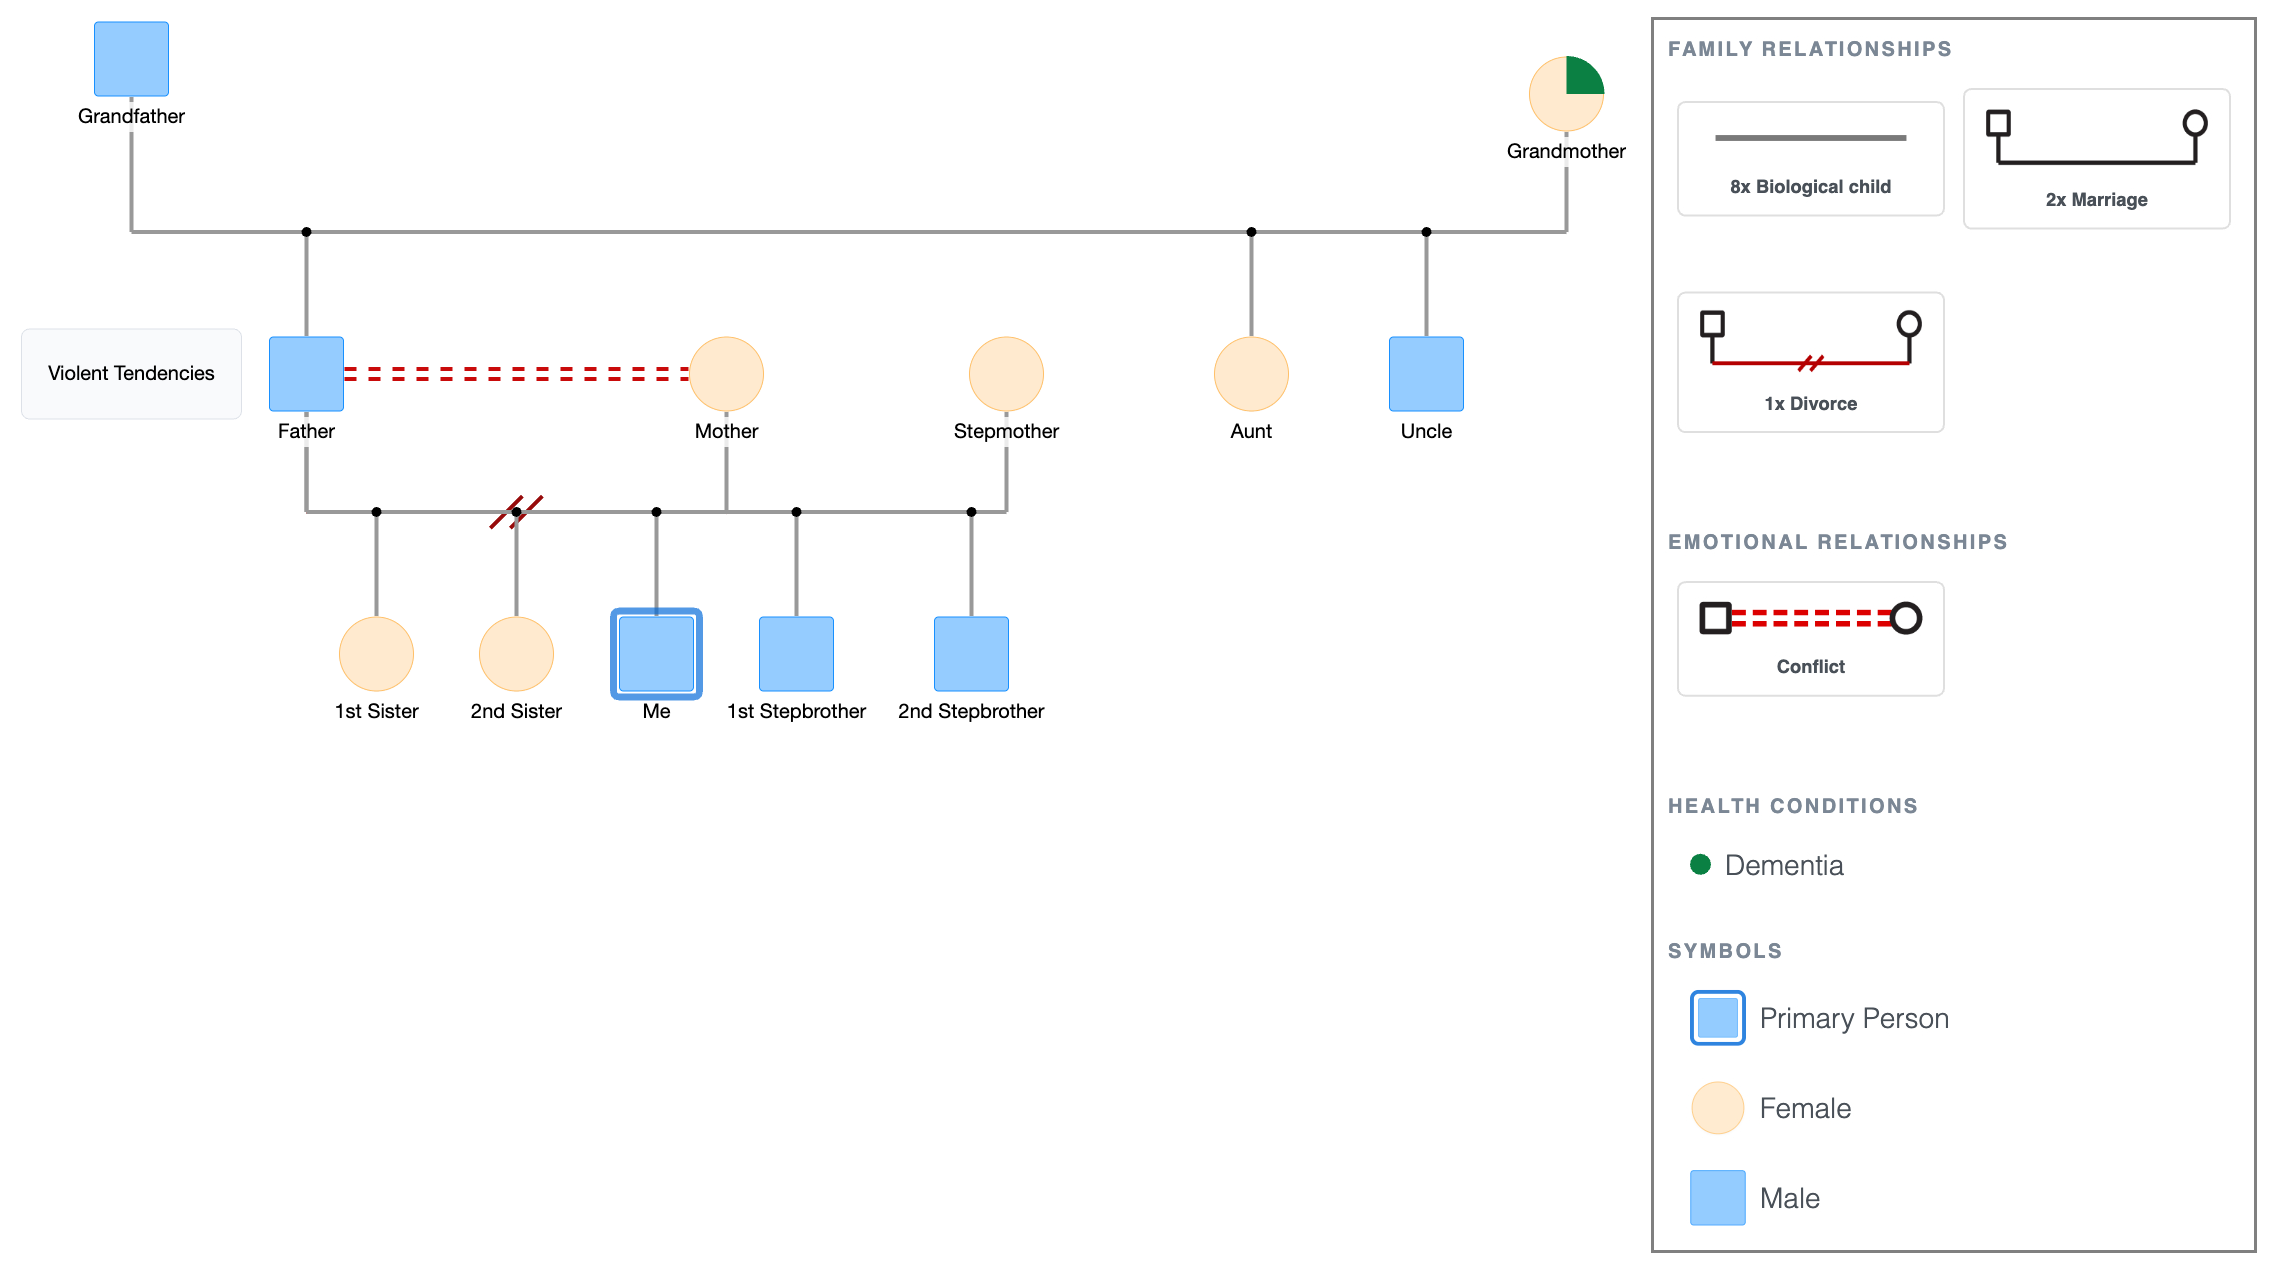
Step 8: Adding health conditions and notes
Tap on anyone’s shape to open the details panel.
Use the "Add Health Condition" field to log medical conditions directly on the person; they appear as colour-coded markers on the shape.
Grandmother has Dementia in this instance.

Add any other relevant information, such as occupation, cause of death, age, behavioural notes, etc., using the Notes field in the left side panel.

You can now see that Father has violent tendencies, which is an explanation for his divorce from Mother.
Adding health conditions and notes
Review and export
Zoom out and run through this checklist before exporting:
- Male left, female right in every couple pair.
- Children in birth order, oldest on the left, youngest on the right.
- Each generation should be on the same horizontal level.
- Biological child connection lines are vertical.
- Multiple partners are ordered correctly, with the first partner closest, in that order.
- Primary Person toggle on for the subject of the genogram.
- Names of every person included.
- Health conditions and notes filled in where relevant.
To export: tap PNG or PDF in the top bar.
Adding health conditions and notes
Explore this genogram and adapt it to your needs.
FAQ
How do I make a genogram online for free?
Go to EasyGenogram; it's free to use. The canvas opens with a default family structure ready to edit. Build your genogram, then export as PNG or PDF when done.
What is the difference between making a genogram online and by hand?
The main difference is flexibility. Online tools let you move people around, change relationship types, and add details without redrawing anything. By hand, the order you draw matters because mistakes are harder to fix. For anything you'll share, submit, or reuse, an online tool is faster.
How many generations should an online genogram include?
Three is the standard. Two works for simple overviews. Four or more is useful for tracking hereditary or behavioral patterns, and easier to manage online than on paper, where space runs out quickly.
Can I make a genogram online without downloading anything?
Yes. EasyGenogram runs entirely in the browser; no installation needed. Open the tool, edit the canvas, and export when done.
Can I use an online genogram tool for telehealth sessions?
Yes. Because EasyGenogram runs in your browser, you can build or update a genogram during a session and export it immediately. It works better than paper for telehealth precisely because nothing needs to be scanned or photographed afterward.
Sources
- Genograms: Assessment and Treatment (4th ed.)
- Genograms for Psychotherapy