Appearance
How to Draw a Genogram (By Hand)
You can draw a genogram by hand with a landscape page, three generation bands, standard symbols, and a clean pass of structural and emotional lines. Hand-drawing works well for class assignments and quick planning before you move into a digital tool. This guide shows the full paper workflow step by step.
How to Draw a Genogram by Hand: Step by Step
These are six steps on how to draw a genogram by hand.
Step 1: Set up your page
Turn the paper landscape, not portrait. Genograms grow sideways, so the horizontal space fills up long before the vertical does.

Before drawing anything, sketch three horizontal bands across the page in pencil: one for each generation.

- Top band for the 1st generation (grandparents).
- Middle for the 2nd generation (parents).
- Bottom for the 3rd generation (children).
This takes only a few seconds and helps you keep the generations properly aligned.
Have a pencil (easier to erase and redraw), a pen for later (if needed), and a symbol reference nearby. If you don’t have one, the genogram symbols guide covers everything you'll need.
Step 2: Place your people in pencil positions
Place every person on the page first as a shape (squares for males, circles for females) in roughly the right position within their band.
Also, indicate the primary person (the one around whom the genogram is built).
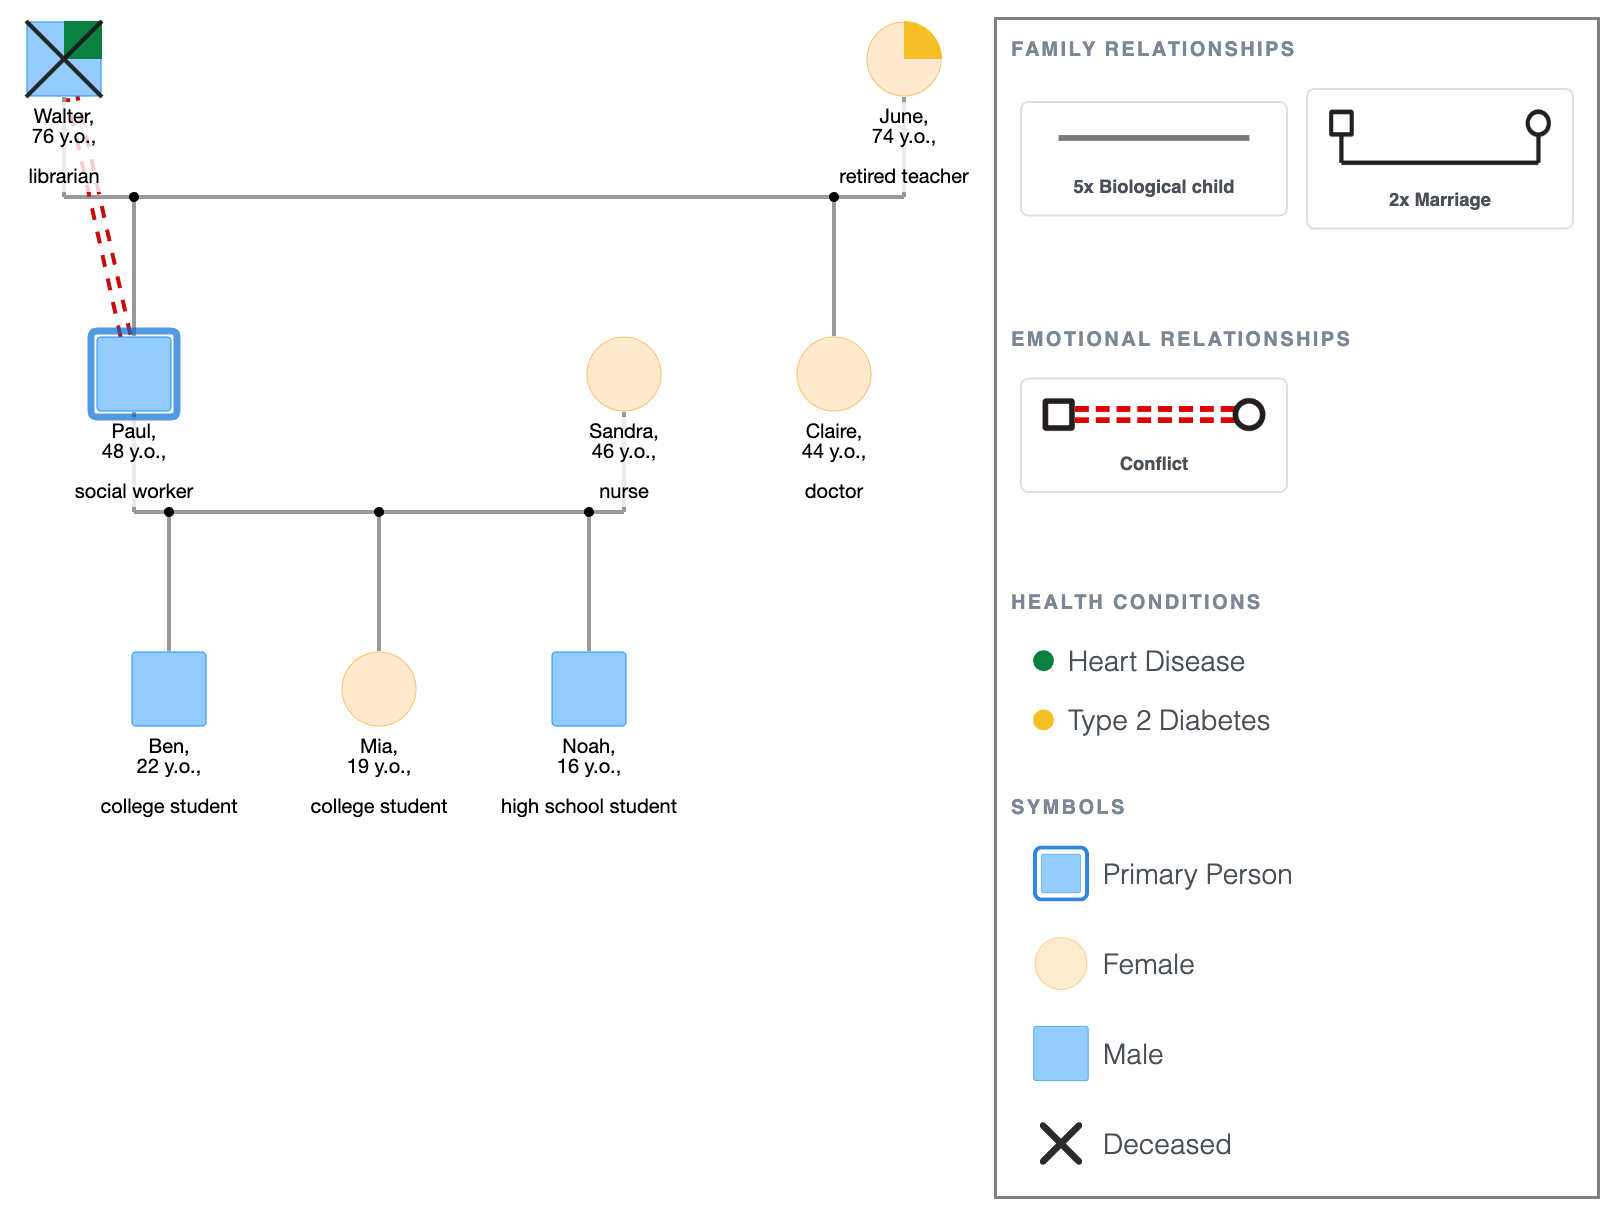
For this walkthrough, we’ll use the Mercer family throughout:
- Grandparents: Walter and June, married.
- Their children: Paul and Claire.
- Paul married Sandra. They have three kids: Ben, Mia, and Noah.
- Claire is unmarried, with no children.
- Paul is the primary person for this genogram.
So, using the Mercers:
- Walter and June will be in the top band.
- Paul and Claire will be in the middle band, with Sandra to Paul’s right.
- Ben, Mia, and Noah are in the bottom band, below Paul and Sandra.
- Claire sits in the middle band with no one below her.
- Paul has a double outline drawn over his shape, indicating he’s the primary person.

Check that the spacing works and everyone fits.
Step 3: Draw the structural lines
Now connect everyone. Work top to bottom, couples before children.
- First generation:
Draw a solid horizontal marriage line between Walter and June.
- Second generation:
Drop a vertical line from the midpoint of Walter and June’s marriage line down to a horizontal sibling bar.
Paul hangs from the left of this bar, while Claire hangs from the right (birth order is oldest to youngest).
Sandra connects to Paul’s right with a solid marriage line (couple order is male left, female right).
Claire has no partner, so her shape just sits at the end of the sibling bar.
- Third generation:
Below the Paul-Sandra marriage line, draw a horizontal sibling bar and drop vertical lines down to Ben on the left, Mia in the middle, and Noah on the right.
Nothing drops below Claire.
You can erase the initial three outline bands before this sketch.

Step 4: Draw the emotional lines
Draw emotional relationship lines directly between the people where relationship quality matters. These connect any two individuals, not just couples, and don't follow the structural hierarchy.
Say Walter and Paul have a conflicted relationship, you’d draw double dashed lines between them, cutting vertically between the two generations (you can use a red pen for this).

That one mark changes what the diagram says about their relationship.
Draw the needed emotional lines after the structure is complete so you can see where they’ll cross existing lines and route them without creating a tangle.
Step 5: Add the legend and any relevant notes
After adding the relevant notations, pick a corner and write out every symbol you used and what each one means.
You can also add small notes directly on, under, or around the shapes.
For this diagram, we’re adding in the following:
- X = deceased (Walter).
- Green shading in one corner of Walter’s shape (heart disease).
- Yellow shading in one corner of June’s shape (type 2 diabetes).
- The ages of each person.
- Their occupation.

If the diagram is already crowded, use a small reference letter on the shape and write the full note at the bottom of the page instead.
Step 6: Finalize
Trace over your pencil lines in pen.
Then go through this checklist before submitting or using the genogram:
- Males left, females right in every couple.
- Children in birth order, oldest on the left, youngest on the right.
- Each generation is on the same horizontal level.
- Child connection lines are vertical, not angled.
- The primary person has a double outline over their shape.
- Names and ages of every person.
- Occupations noted where relevant.
- Relevant illnesses added in.
- Legend is present and accounts for every symbol used.
What to Do If Your Genogram Doesn’t Fit on One Page
Once there are multiple divorces, remarriages, or more than two or three children per couple, running out of space is common.
These are a few options on what to do:
- Redraw on a larger sheet, such as A3 or tabloid.
- Split across separate sheets: one for each parental side (i.e., paternal and maternal), and one for the primary person’s generation. This is standard practice in social work placements where families are large or complex.
- Move to a digital tool. See how to make a genogram online.
The diagram below is the Mercer family genogram built using EasyGenogram. It has the same structure as the hand-drawn one above; it’s also editable and rearrangeable at any point, and exportable as a PDF or PNG when you're done.
The Mercer Family: Simple Genogram Example
FAQ
How do I draw a genogram by hand step by step?
Start with a landscape page and sketch three horizontal guide bands; one per generation. Place all your people as shapes in pencil before drawing any lines. Then draw the structural connections from top to bottom, add emotional lines last if needed, build your legend, and finish by tracing over in pen and erasing the pencil lines.
What size paper should I use for a hand-drawn genogram?
Standard A4 or letter paper works for simple three-generation genograms. If the family has multiple remarriages or large sibling groups, A3 or tabloid gives you more room. Whatever size you use, orient it landscape.
Do I need a legend on a hand-drawn genogram?
Yes, if you’re submitting it for a class or using it professionally. The legend tells anyone reading the diagram what your symbols mean. If you used standard symbols throughout, the legend is quick to write. If you used any abbreviations or custom marks, it becomes essential.
How many generations should a hand-drawn genogram include?
Three is the standard. Two works for simple overviews. Four or more is useful for tracking patterns across time, but it gets difficult to fit on paper, and that's usually when you should use a digital tool like EasyGenogram.
Can I draw a genogram in pencil first?
Yes, and you should. Drawing the full structure in pencil before inking lets you adjust spacing and catch placement errors before they’re permanent. Trace over in pen once you’re satisfied, then erase the pencil.
Sources
- Genograms: Assessment and Treatment (4th ed.)
- Genograms for Psychotherapy